Showing posts with label layout quilt blocks. Show all posts

Want a variety of designs?

The more you machine quilt the Terry Twist Patterns, the more they amaze you!!!

And they are sooo different every time you use them in a block, then a sashing, then a border.

Here is an edge-to-edge. Stitched the TT spines 9 blocks across and 2 blocks deep in one continuous line. Then went back and used the TT spines and feathered about 2" away on each side of the spine.  This left some wonderful open areas and gave this king size quilt some puffy texture :)

And we all want versatile machine quilting patterns that use simple techniques so we can Free Motion Feathers fast.


Get the tools that make these Terry Twist Designs irresistible for busy machine quilters.


click for more info on Terry Twist Stencils Set


click for more info on Terry Twist Template Set

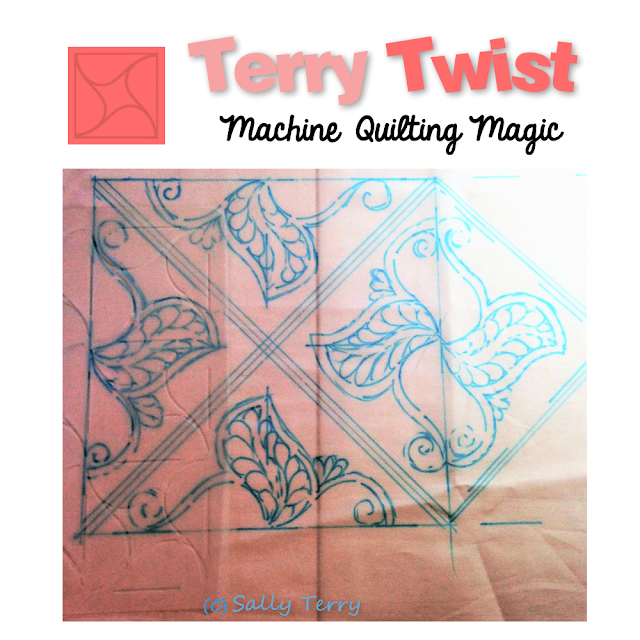
Another Block Design with the Terry Twist just messing around

 Check out both the Terry Twist Stencil and Ruler Sets

If you have the stencils this is the 9" 9-Patch Square using its' 3" Terry Twist Pattern Design. It is also easy to create using the Template Rulers since you have it in the 3".

I laid it out on the edges of the block and then continued it on the other side of the seam, just for fun :) to see what it would look like. 

Interesting pattern on point with a few machine quilting free motion feathers thrown in.

Since it is asymmetrical it is very forgiving indeed. 


Hope you try it.

Pressing Seams The Right Way Can Give You A Higher Quality of Machine Quilting

Hi, just figured out what to do with the borders.

The borders are 2" finished, so I cut 2 1/2" of fabric.
Dark purple sashings are 1" finished, cut at 1 1/2".

Added the little 2 1/2" x 2 1/2" corner square so it finishes at 2".
If you want to add more do, but wanted to keep this simple.

Single Fabric Quilt 

Pressing Seams Open


This is kinda my pet peeve....when you have such intensely colored fabrics, what color of thread do you use when you stitch-in-the-ditch? (Have resorted to variegated threads for SID...it turned out great, and was a bit unusual, but the casual style of the quilt let me get away with it.)

Now I see why quilters don't stitch-in-the ditch any more!!! There is no thread color that works without making it look strange.

And unless you use monofilament, which is usually not the customer's preferred choice for their quilts then the only solution is to press the sashing seams open and ditch on the low side of the seam in the sashings using a matching thread. Most sashing fabric is a bit plainer and mostly monochromatic so it is easy to blend threads.
remember?
Love it that you don't have to change thread, can do the entire thing at one time, creating a skeleton of stability to the quilt.

Please comment....if you have anymore suggestions or what you do to SID and choosing thread.
Now it is ready for the quilting!!!!

Yours in the love of quilting, Sally

P.S. This tip and more is found in Pathways From Quilt Top To Quilted.
Right now it is 20% OFF here is the link  http://www.bobbintext.net/quilt-top-to-quilted-book.html

Use coupon code books20


Making Borders Fit & Square Up The Quilt Top At The Same Time

Have you ever had a border that rippled....dangled like a flag....had it's own personality totally different than the body of the quilt?

We are going to fix that before we quilt it.

1. Last resort, remove, re-measure, re-sew.

2. OR for straight un-mitered borders
A. Lay the border fabric under the horizontal middle of the quilt top for top and bottom borders. Be sure to cut enough raw fabric to stick out under each side of the quilt. If you are fussy cutting your border be sure allow for the pattern positioning.


B. Next cut TWO (2) horizontal border pieces following the exact outer edges using a straight edge template to keep the cut straight. Now you will have 2 borders the same length.


C. Sew to top and bottom of the quilt top and press.

D. Repeat same steps again (A & B) laying the TWO (2) vertical border pieces under the vertical middle making sure they are under the sewn top and bottom borders. Cut. Now you will have the two vertical border pieces that include the already sewn top and bottom borders length.

E. Sew vertical borders and press.

This will automatically square up your quilt top without a lot of measuring. This can work for outer sashings as well. I recommend measuring the body sashings during construction.

In case you luckily have not experienced this ;) here are some great examples.
https://www.youtube.com/watch?v=XzoL7ddTEnA

Hope this helps.

Yours in the love of quilting,


Summer Time Machine Quilting and Piecing....Fabulous Combination

 
Red White & Blue Variegated Threads on a Patriotic Quilt my first year as a machine quilter 15 years ago....
Happy Happy Summer Days & Happy 4th of July!!!


If you have been following along with this one fabric quilt it is now time to sew your rows together.
First stitch your blocks together with a sashing between each one without a sashing on the ends of the rows.


Next I laid the randomly assembled rows to see what was most pleasing visually.

Finally measure one assembled row across and cut your first length wise sashing that will connect the rows.
Cut enough for top and bottom outside rows.
9 rows of blocks = 10 sashing


With my configuration is goes like this:

4.5" x 5 interior blocks = 22.5 + 4.75" x 2 (9.5" for 2 end blocks ) = 32" + 1" x 6 (sashings) = 38"

TIP: If you press the sashings away toward the blocks, that will make it easy to stitch-in-the-ditch throughout the entire quilt if you choose.

Quilt Happy
Yours in the love of quilting, Sally

to join our Tips, Tricks & Twists newsletter click the link  loaditandgo@getresponse.com

The Black Trash Bag Method of Quilt Assembly and Design

Have you found a great piece of fabric and it really only goes with a limited number of fabrics with the right style?...from the same color ways collection.


But you only have that fabric and maybe one or two others. Well...

I found this great piece of Alexander Henry.

  1. Cut it up in 5" squares
  2. Organized by predominant colors
  3. Determined block per row ( 7x9 )
  4. Then cut 5" x 1 1/2" sashing pieces and pieced one to each 5" square.
  5. Picked a few accent pieces of bright orange and light orange.
  6. Now to lay it out randomly. Tweak for visual balance.
HOW DO YOU DO THAT? EASY...


Put your blocks in a large black trash bag and pull them out at random! Of course, no peeking. It will give you the best and quickest way to randomness.


Yours in the love of quilting,
Sign up for Tips, Tricks & Twists Newsletter, email to this link for lots more from the Quilted Muse:  loaditandgo@getresponse.com or go to http://www.sallyterry.com